chapter(一)
1.1 题记
Git又名分布式版本控制系统,是大神Linus Torvalds 为了帮助管理 Linux 内核开发而开发的一个开放源码的版本控制软件。 Torvalds 开始着手开发 Git 是为了作为一种过渡方案来替代 BitKeepe. Torvalds 只花了两周时间,自己用C写了一个分布式版本控制系统,大喊:厉害啊! 重点 :Git是开源而且免费的,且为最流行的分布式管理软件。
1.2 Git能干什么?
简单来讲,当你写代码时,因为会有很多版本,你不可能也不会把每个版本都特殊存起来。 这些繁琐的事情很烦,但有时候却有很有用,而Git就是帮你干这些繁琐事情的。
1.3 分布式管理VS集中式管理
- 集中式必须有一个中央服务器,每个程序员,先从这里取得最新的版本,写完在推给中央服务器。 通过上面说的,集中式管理必须要有网,没网,白瞎。
- 而分布式管理不同,它没有中央服务器,但不代表它不需要中央服务器,每个人本地都是完整的版本库。
1.4 安装Git
Linux上,若使用Debian或Ubuntu,直接使用如下代码:
sudo apt-get install git
windows系统,直接去官网下载程序
本系列都是在Linux进行操作滴。其他系统的操作方法是类似滴。
1.5 小试牛刀-创建仓库(repository)
- 首先,我先建立一个名为testGit的目录。
- 创建目录命令:
mkdir testGitcd testGit -
结果如下:
 mkdir testGit
 root@ubuntu-xenial:/myCode/Git/testGit# pwd
 /myCode/Git/testGit
- 创建目录命令:
-
其次,将这个目录变为仓库(repository),命令:
git initroot@ubuntu-xenial:/myCode/Git/testGit# git init Initialized empty Git repository in /myCode/Git/testGit/.git/ root@ubuntu-xenial:/myCode/Git/testGit# ls root@ubuntu-xenial:/myCode/Git/testGit# ls -ah . .. .git root@ubuntu-xenial:/myCode/Git/testGit#
通过上面的代码可以看到,git init后,立马显示创建了一个空Git仓库:
Initialized empty Git repository in /myCode/Git/testGit/.git/
ls下,发现没有反应。
ls -ah下,发现出现了一个. .. .git
这是因为创建的.git目录是隐藏的,ls -ah可以显示隐藏的目录
1.6 小试牛刀-进行文件添加和提交
创建了仓库,我们就开始正式进入实战:
- 首先 创建一个文档吧,我随便写了一个简单的C++程序
vim helloword.cpp写入如下代码:1 #include<iostream> 2 3 int main() 4 { 5 std::cout << "This is a program that test Git!" << std::endl; 6 return 0; 7 }保存,ls下:
root@ubuntu-xenial:/myCode/Git/testGit# vim helloword.cpp root@ubuntu-xenial:/myCode/Git/testGit# ls helloword.cpp root@ubuntu-xenial:/myCode/Git/testGit# -
重点来啦:用命令
git add给Git说,我要把文件添加到仓库中~git add helloword.cpp提交完,如下,发现什么反应都没有,嗯哼,要知道,有时候,没消息,就是最好的消息。root@ubuntu-xenial:/myCode/Git/testGit# git add helloword.cpp root@ubuntu-xenial:/myCode/Git/testGit#此时,Git已经通过命令
git add,把文件添加仓库中了。 -
git add只是文件添加仓库中,就好比你去图书馆还书,你仅仅是把递给了图书管理员。-这步就好比添加到仓库 然后,管理员要根据图书分类,把它重新放到对应的书架中,方便其他同学借阅。这步是什么呢? 是的:在Git中这步叫提交,命令git commit往往在git commit后面加入一个参数-m "提交说明",强烈建议你输入有意义的话!root@ubuntu-xenial:/myCode/Git/testGit# git commit -m "test Git program" *** Please tell me who you are. Run git config --global user.email "you@example.com" git config --global user.name "Your Name" to set your account's default identity. Omit --global to set the identity only in this repository. fatal: unable to auto-detect email address (got 'root@ubuntu-xenial.(none)') root@ubuntu-xenial:/myCode/Git/testGit# ^C root@ubuntu-xenial:/myCode/Git/testGit#没有成功啊!看看提示发现,要让我添加邮件,命令都告诉我了。
  git config --global user.email "you@example.com"
  git config --global user.name "Your Name"
添加邮箱后,再试一次:
  root@ubuntu-xenial:/myCode/Git/testGit# git commit -m "test Git program"
  [master (root-commit) d6e5713] test Git program
   1 file changed, 7 insertions(+)
   create mode 100644 helloword.cpp
  root@ubuntu-xenial:/myCode/Git/testGit#
上面这段的意思是:1 file changed, 1个文件被改动;7 insertions(+),插入了7行内容。
-
【注】向Git提交文件需要两步,
commit一次可以提交很多文件,而add是可以添加很多文件或反复添加很多文件: 如:git add helloword.cpp helloword2.cpp helloword3.cpp git commit -m "add three files"
1.7 总结:
git init -初始化Git仓库
git add <file> -添加文件到仓库
git commit -m "说明" -提交文件到仓库
chapter(二)
2.1 插:如何更改当前Git用户名和邮箱?
使用git config --global --list可以查看当前账户和邮箱
再使用:
git config --global user.name "username"
git config --global user.email "@email"
2.2 继续Git,使用git status 查看状态
toto@pc:~/code/testGit$ git status
On branch master
nothing to commit, working tree clean
可以发现似乎没什么值得看的信息。
然后vim helloword.cpp,增加一句话std::cout << "test git status" << std::endl;
#include<iostream>
int main()
{
        std::cout << "This is a program that test Git!" << std::endl;
        std::cout << "test git status" << std::endl;
        return 0;
}
:wq -保存退出
再输入: git status
toto@pc:~/code/testGit$ git status
On branch master
Changes not staged for commit:
  (use "git add <file>..." to update what will be committed)
  (use "git checkout -- <file>..." to discard changes in working directory)

        modified:   helloword.cpp

no changes added to commit (use "git add" and/or "git commit -a")
toto@pc:~/code/testGit$
可以看到:git的提示和之前的提示完全不同了。 上面的命令的意思是:helloword.cpp被修改过了,但还没有准备提交的修改
2.3 如何看到底修改了什么?
上面的git status只能看到是哪个文件被改了。
但是,这个文档什么被改了呢?
嗯!有的,可以使用git diff命令
toto@pc:~/code/testGit$ git diff
diff --git a/helloword.cpp b/helloword.cpp
index 4894911..d342859 100644
--- a/helloword.cpp
+++ b/helloword.cpp
@@ -3,5 +3,6 @@
 int main()
 {
        std::cout << "This is a program that test Git!" << std::endl;
+       std::cout << "test git status" << std::endl;
        return 0;
 }
toto@pc:~/code/testGit$
注意看结果:明显可以看到增加的那一行是什么。
我们在git add helloword.cpp 没反应,好结果!
我们在git commit -m "add new line that test git status
toto@pc:~/code/testGit$ git commit -m "add new line that test git status"
[master 2fe4439] add new line that test git status
 1 file changed, 1 insertion(+
在git status以下:
toto@pc:~/code/testGit$ git status
On branch master
nothing to commit, working tree clean
发现结果:显示没有什么修改,工作目录是干净的!
2.4 版本管理之版本回退
现在我们已经有3个版本了,我有加了一个版本,这个版本是重复上面的步骤。 如果不断的进行修改,版本就会逐渐增加。
- 假设某天,你突然代码写错了!要回退到之前的版本,这时该怎么办?
先看看之前的版本:
#include<iostream>
int main()
{
     std::cout << "This is a program that test Git!" << std::endl;// 版本1只有此行
     std::cout << "test git status" << std::endl; // 版本2有此行和上一行
     std::cout << "test git status2" << std::endl; // 版本3有此行和上2行
     return 0;
}
- 只有3个版本,我们还能记住那个版本是什么?可是如果版本多!内容几千行怎么办?
git 提供的命令
git log,结果如下:
toto@pc:~/code/testGit$ git log
commit cd5b52f2f8f5339973092461584002f3ff984ff4 (HEAD -> master)
Author: StudyWithoutStress
Date:   Sun May 2 21:29:44 2021 +0800

    test git status2

commit 2fe44398b637c766a31b590ab73345cba89b5681
Author: StudyWithoutStress
Date:   Sun May 2 17:06:15 2021 +0800

    add new line that test git status

commit 01630fbc39a8f8719b8409ce39ad5d19e60f4497
Author: StudyWithoutStress
Date:   Sun May 2 16:07:58 2021 +0800

    test Git program
toto@pc:~/code/testGit$
可以清晰的看到,三个版本,当时git commit的注释,更改时间,作者信息,还有一个很长的码,这是commit id-版本号;这是一个16进制的数字。
注意git log的显示顺序是从最近到最远
这里只有三个版本,如果版本很多,git log一下子就乱了!可以采用参数--pretty=oneline
toto@pc:~/code/testGit$ git log --pretty=oneline
cd5b52f2f8f5339973092461584002f3ff984ff4 (HEAD -> master) test git status2
2fe44398b637c766a31b590ab73345cba89b5681 add new line that test git status
01630fbc39a8f8719b8409ce39ad5d19e60f4497 test Git program
- 现在我们要回退版本了!
命令git reset --hard HEAD^,HEAD^是退回上一个版本,HEAD^^是退回上上一个版本。
以此类推,但是如果是上99个版本呢?
采用命令:HEAD~99
结果:
toto@pc:~/code/testGit$ git reset --hard HEAD^
HEAD is now at 2fe4439 add new line that test git status
可以看到:已经退回到上一个版本了。
我们看看helloword.cpp是不是回退了!
果然回退了哦!
- 现在我有发现,我还是想要第3个版本的代码!
同样的命令,不过一定要知道第3个版本的
commit id,这个可以通过shell窗口自行寻找!
toto@pc:~/code/testGit$ git reset --hard cd5b52f
HEAD is now at cd5b52f test git status2
toto@pc:~/code/testGit$
可以看到,果然回来了!
- 现在又有问题了,我把
commit id忘了!怎么办? git给你想好解决方法了! 命令git reflog可以查到!
toto@pc:~/code/testGit$ git reflog
cd5b52f (HEAD -> master) HEAD@{0}: reset: moving to cd5b52f
2fe4439 HEAD@{1}: reset: moving to HEAD^
cd5b52f (HEAD -> master) HEAD@{2}: commit: test git status2
2fe4439 HEAD@{3}: commit: add new line that test git status
01630fb HEAD@{4}: commit (initial): test Git program
可以发现,commit id 的信息很清楚。
2.5 总结
git config --global --list可以查看当前账户和邮箱git status查看git 当前的状态git diff查看文件具体改了什么git reset --hard版本变动 指定HEAD^或commit id:
chapter(三)
3.1 暂存区概念对Git很重要
暂存区是什么呢? 我们先谈谈别的概念:
- 工作区(woking directory) :工作区就是能看到的电脑目录。 如:
toto@pc:~/code/testGit$ pwd
/home/toto/code/testGit
命令:pwd后显示的目录,就是工作目录。
- 仓库有名版本库(repository) : 多说无益,直接看看
toto@pc:~/code/testGit$ ls -ah
.  ..  .git  helloword.cpp
这个.git是什么呢?是的!就是版本库!
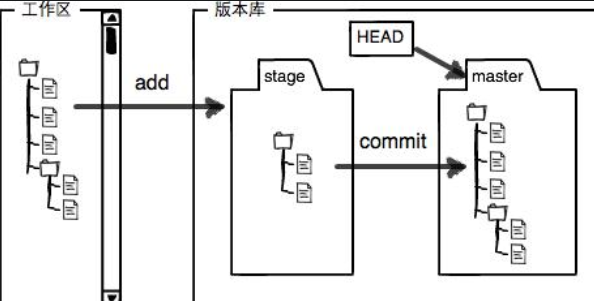
*Figure3.1*显示的版本库中里就有一个*stage*,这个*stage*就是暂存区

图片太形象了,我们在工作区,使用命令`git add`,将`helloword.cpp`提交到*stage*中。

之前使用过`git init`,那时Git就为我们创建了一个分支`master`,以及指向`master`的指针`HEAD`

再使用命令`git commit`,有把再*stage*(暂存区)内容提交到了分支`master`中!

这样就能理解为何之前说`git add`可以执行很多次,那是因为`git add`只是把它放到暂存区中了。只有执行了`git commit`才会放在分支`master`中。 3. 所以暂存区的概念就很清晰了!
3.2 再次理解暂存区的概念
- 有了
helloword.cpp,我感觉不够用,因为拿到代码的人可能不懂这是干什么呢?所以,我必须写一个说明文档README.txtvim README.txt写下如下内容:
This document is a description!
The name is README.txt!
在看下状态:
toto@pc:~/code/testGit$ git status
On branch master
Untracked files:
(use "git add <file>..." to include in what will be committed)

  README.txt

nothing added to commit but untracked files present (use "git add" to track)
可以看到Git告诉我们,新增加了一个README.txt
- 我又想在
helloword.cpp中增加东西。vim helloword.cpp写下如下内容:
#include<iostream>
int main()
{
       std::cout << "This is a program that test Git!" << std::endl;
       std::cout << "test git status" << std::endl;
       std::cout << "test git status2" << std::endl;// 新增的一行
       int a = 1;
       return 0;
}
在查看下状态:
toto@pc:~/code/testGit$ git status
On branch master
Changes not staged for commit:
 (use "git add <file>..." to update what will be committed)
 (use "git checkout -- <file>..." to discard changes in working directory)

	modified:   helloword.cpp

Untracked files:
  (use "git add <file>..." to include in what will be committed)

	README.txt

no changes added to commit (use "git add" and/or "git commit -a")
可以看到Git告诉我们helloword.cpp被修改了,而README.txt还未被添加!
git add下
    toto@pc:~/code/testGit$ git add helloword.cpp README.txt
    toto@pc:~/code/testGit$ git status
    On branch master
    Changes to be committed:
      (use "git reset HEAD <file>..." to unstage)

    	new file:   README.txt
    	modified:   helloword.cpp

    toto@pc:~/code/testGit$
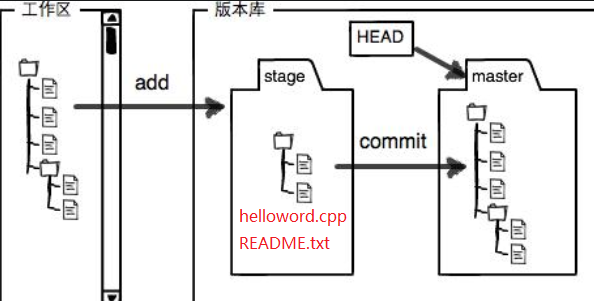
可以看到暂存区(stage)已经被放了两个文件
git commit下
    toto@pc:~/code/testGit$ git commit -m "understand stage"
    [master 7064df2] understand stage
     2 files changed, 3 insertions(+)
     create mode 100644 README.txt
    toto@pc:~/code/testGit$ git status
    On branch master
    nothing to commit, working tree clean
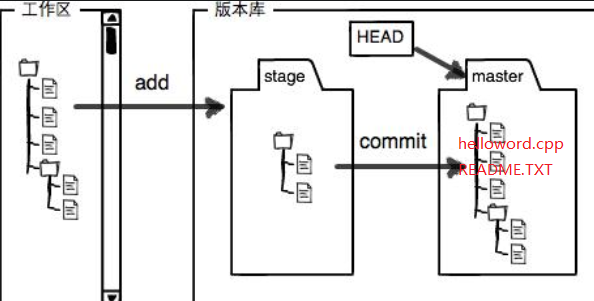
此时,版本库就是这样子了:
3.4 暂存区补充
如果一个文件没有进行git add,那还能git commit吗?
仔细想想!
如果有了暂存区的概念,这个答案就很简单:
未从工作区 git add 到暂存区,就无法从暂存区 git commit到 master中!
3.5 暂存区总结
总结就是自己实践去跟着做一遍!
chapter(四)
4.1 如何撤销修改?
git checkout -- file可以丢弃工作区的修改
什么意思呢? 比如说你写错了一行代码或者写错了一句话,我要把它删掉。这是就可以撤销修改了、 让我们实际操作一遍,这样更容易让人理解:
在README.txt中写下这句话:Summer is comming!
toto@pc:~/code/testGit$ vim README.txt
toto@pc:~/code/testGit$ cat README.txt
This document is a description!
The name is README.txt!
Summer is comming!
看到这句话我发现不对,要撤销!先git status下
toto@pc:~/code/testGit$ git status
On branch master
Changes not staged for commit:
  (use "git add <file>..." to update what will be committed)
  (use "git checkout -- <file>..." to discard changes in working directory)

	modified:   README.txt

no changes added to commit (use "git add" and/or "git commit -a")
可以发现README.txt显示被修改,是在工作区。
而且啊,Git已经很人性的告诉我们,可以使用git checkout -- <file>...,把其在工作区撤销掉。
那就用git checkout -- <file>...试下:
toto@pc:~/code/testGit$ git checkout -- README.txt
toto@pc:~/code/testGit$ git status
On branch master
nothing to commit, working tree clean
toto@pc:~/code/testGit$ cat README.txt
This document is a description!
The name is README.txt!
看到没,刚才修改的那个文档已经被撤销了。
有了撤销修改的概念,我们就要分情况了!
- 刚刚尝试的是修改的文档还在工作区,并未
git add给暂存区 - 文档已经被
git add给暂存区 - 文档已经被
git commit给master
4.2 撤销修改情况2
撤销修改情况2是指:文档已经被git add给暂存区
实践出真理。我们直接试试:
toto@pc:~/code/testGit$ vim README.txt
toto@pc:~/code/testGit$ cat README.txt
This document is a description!
The name is README.txt!
The Winter is comming!
toto@pc:~/code/testGit$ git add README.txt
toto@pc:~/code/testGit$ git status
On branch master
Changes to be committed:
  (use "git reset HEAD <file>..." to unstage)

	modified:   README.txt
我先是vim README.txt在其中添加了一行:The Winter is comming!
然后,将其git add进暂存区
最后,获取了一下状态:git status
可以发现,Git 又已经很贴心的告诉我: 用命令git reset HEAD <file>可以把暂存区的修改撤销掉(unstage),然后放回工作区。
之前在chapter(二)中的版本回退中,我们已经使用过命令git reset HEAD <file>了。
在这里可以把修改的文档从暂存区退回到工作区
toto@pc:~/code/testGit$ git reset HEAD README.txt
Unstaged changes after reset:
M	README.txt
toto@pc:~/code/testGit$ git status
On branch master
Changes not staged for commit:
  (use "git add <file>..." to update what will be committed)
  (use "git checkout -- <file>..." to discard changes in working directory)

	modified:   README.txt

no changes added to commit (use "git add" and/or "git commit -a")
toto@pc:~/code/testGit$ cat README.txt
This document is a description!
The name is README.txt!
The Winter is comming!
仔细看上面的代码展示,就会发现在使用命令git reset HEAD README.txt后,Git提示我们已经将该文件回退到工作区了。
如果我们先把The Winter is comming!这句话撤销掉,那再次执行一下4.1节介绍的内容。
即:使用命令:git checkout -- <file>
4.3 撤销修改情况3
撤销修改情况3是指:文档已经被git commit从暂缓区提交给master
这种情况的操作就很简单了:直接使用chapter(二)中的版本回退,即可! 这个前提是:你不能把本地仓库推送到远程仓库
4.4 总结
若在工作区想撤销,可用命令:git checkout -- <file> 将修改文档从工作区撤销;
若在暂存区想撤销,可用命令:git reset HEAD <file> 将修改文档从暂存区撤销到工作区;
若在master中想撤销,可用命令:git reset HEAD <file> 将修改文档退回到上一版本。
chapter(五)
5.1 如何删除文件?
上一章说的是撤销修改,这一章就谈谈如何删除文件。 实践是检验真理的唯一标准,话不多说,直接干:
toto@pc:~/code/testGit$ vim deleteFile.txt
toto@pc:~/code/testGit$ cat deleteFile.txt
This is a test deleted file!
toto@pc:~/code/testGit$ git add deleteFile.txt
toto@pc:~/code/testGit$ git commit -m "test deleted file"
[master 190efbd] test deleted file
 1 file changed, 1 insertion(+)
 create mode 100644 deleteFile.txt
toto@pc:~/code/testGit$ git status
On branch master
nothing to commit, working tree clean
toto@pc:~/code/testGit$ ls
deleteFile.txt  helloword.cpp  README.txt
toto@pc:~/code/testGit$ rm deleteFile.txt
toto@pc:~/code/testGit$ ls
helloword.cpp  README.txt
toto@pc:~/code/testGit$ git status
On branch master
Changes not staged for commit:
  (use "git add/rm <file>..." to update what will be committed)
  (use "git checkout -- <file>..." to discard changes in working directory)

	deleted:    deleteFile.txt

no changes added to commit (use "git add" and/or "git commit -a")
上面,我先是vim deleteFile.txt了一个文件,然后将其add和commit进了仓库。
然后,直接使用自带的rm deleteFile.txt将文件进行了删除,可以发现ls后确实删除了。
用git status可以看到Git提示:这个文件被删除。
但这仅仅时在文件目录管理中把它删除,我们的暂缓区中还有这个文件,使用命令git ls-files可以看暂缓区有什么文件。
toto@pc:~/code/testGit$ git ls-files
README.txt
deleteFile.txt
helloword.cpp
这时,我们需要使用命令git rm deleteFile.txt
toto@pc:~/code/testGit$ git rm deleteFile.txt
rm 'deleteFile.txt'
toto@pc:~/code/testGit$ git ls-files
README.txt
helloword.cpp
看到没,命令git ls-files后,我们的deleteFile.txt文件已经从暂缓区移除出去了。
但之前因为使用了git commit,所以这个文件应该还在master中
toto@pc:~/code/testGit$ git status
On branch master
Changes to be committed:
  (use "git reset HEAD <file>..." to unstage)

	deleted:    deleteFile.txt
所以,当我们在git rm后,在git commit一下:
toto@pc:~/code/testGit$ git commit -m "remove deleteFile.txt"
[master 05e641d] remove deleteFile.txt
 1 file changed, 1 deletion(-)
 delete mode 100644 deleteFile.txt
toto@pc:~/code/testGit$ git status
On branch master
nothing to commit, working tree clean
看到没,这样就删除掉了。 在这里一定要搞清暂缓区和master的区别
5.2 总结
- rm
- 把文件从文件目录删除 - git rm
-把文件从暂缓区删除 - git commit
- 如果该文件提交到了**master**中,记得在`git commit`下
补充:命令git ls-files可以看暂缓区有什么文件。
chapter(六)
6.1 初始Github
还记得第一章说过,Git是一款优秀的分布式版本控制软件,而与其相对的是集中式版本控制(SVN). 还记得吗?SVN要有一台电脑充当中央服务器,没有中央服务器,大家就玩完。 而分布式版本控制软件可以没有这个中央服务器,但是不代表它不需要。准确来说它不应该由中央两个字。
而在与其他人交流的时候,我们总要由一个媒介。
可以想象下,在一个组织里,每个人如果都从中央服务器里拷贝一份代码,在自己的电脑里进行工作,干完活,在把自己的工作推送给中央服务器,这样不就可以进行交互了吗?
而这个世界上就有这样的服务器,它就是伟大的Github,看看名字我们就明白了Github 有人会说,能不能自己建立一个服务器,当然可以,只要你有能力有精力,当然是可以的。
要知道Github是免费的远程仓库,每个人都可以建立自己的免费仓库,但是请注意,只要上传,你的代码会被任何人看到。 如果你不想让人看到,也简单,交点钱就好。
所以下面的就不用说了,先去注册一个Github账户吧!有邮箱就可以了哦。 不过请注意,因为不可抗拒的原因,目前Github的访问速度实在有点慢,甚至无响应,如果想顺利访问,建议**上网。
6.2 拿钥匙打开Github大门
当你有了账户,要知道Git与Github的身份验证可以使用SSH和HTTPS,这就相当于打开大门的钥匙。
这里介绍ssh,在自己的用户目录下可以看到.ssh目录:记得用ls -ah,因为它是隐藏的。
进入该目录cd .ssh
toto@pc:~/.ssh$ ls
id_rsa  id_rsa.pub
可以看到有id_rsa和id_rsa.pub两个文件。
- 其中id_rsa是私钥,很重要,别乱传。
- id_rsa.pub是公钥,可以给别人说。
如果你的这个目录下,没有这两个文件,请自行生成下,方法如下:
ssh-keygen -t rsa -C "youremail@example.com"
然后一路回车就好。
有了SSH钥匙,就可以和打开Github大门这把锁了。
6.3 给钥匙做标识,让大门认识你这把钥匙
登录Github网站,打开Account settings,然后再里面找SSH and GPG keys,进去后,点New ssh key,如下图:

进来后,在title中填写一个标识这个ssh钥匙的信息。在key中把你的公钥id_rsa.pub复制进去

在这里你可以添加好多个公钥,这样如果你有好几台电脑,这些电脑就都可以推送了。
6.4 总结
.ssh目录下有你的钥匙,如果没有,命令ssh-keygen -t rsa -C "youremail@example.com"可以生成。- 必须在Github中添加你的
SSH KEY
chapter(七)
7.1 Github创建远程仓库
有了Github账号后,我们就可以免费的创建一个远程仓库。
光说不练,假把式,直接开始干吧!
进入Github网站,寻找New Repository,点进去,这个是创建新仓库的意思。
进去后,如下图:

- 在1处输入仓库名字
- 在2处输入仓库描述
- 在3处选择
Add a README file - 在4处选择创建仓库
这时你的仓库就建立好了,而且Github为我们建立好了一个README.md文件。
有了远程仓库,我们就可以把他克隆到本地仓库中,具体操作:
-
先到这到这里,点
ssh,然后把这个链接复制
- 到本地电脑中,使用
git clone克隆到本地库toto@pc:~/code/testGit$ git clone git@github.com:StudyWithoutStress/StudyGit.git Cloning into 'StudyGit'... remote: Enumerating objects: 3, done. remote: Counting objects: 100% (3/3), done. remote: Total 3 (delta 0), reused 0 (delta 0), pack-reused 0 Receiving objects: 100% (3/3), done. toto@pc:~/code/testGit$ ls helloword.cpp README.txt StudyGit toto@pc:~/code/testGit$ cd StudyGit toto@pc:~/code/testGit/StudyGit$ ls README.md toto@pc:~/code/testGit/StudyGit$ ls -ah . .. .git README.md toto@pc:~/code/testGit/StudyGit$看到没。本地仓库已经把远程仓库克隆进来了。
7.2 如果本地已经创建了一个项目,那怎么将其传到远端
上一节,说的是在远端建立好项目,然后git clone ,但目前我的项目已经在本地写了了点,不想采用上面的方法,该如何操作
- 首先在远端建立一个仓库
- 本地的项目 git add . git commit 保证是最新的
- 本地仓库关联上远程仓库:
git remote add origin git@github.com:xxxxxxxxxxx.git- 出现错误:
fatal: remote origin already exists.这是因为本地仓库已经进行了依次关联远程仓库 - 所以
git remote rm origin - 在管理依次
- 出现错误:
- 从远端拉代码:
git pull origin master- 出错 :
remote: Enumerating objects: 4, done.
remote: Counting objects: 100% (4/4), done.
remote: Compressing objects: 100% (4/4), done.
remote: Total 4 (delta 0), reused 0 (delta 0), pack-reused 0
Unpacking objects: 100% (4/4), 849 bytes | 1024 bytes/s, done.
From github.com:bugthree/MiniCAD
     * branch            master     -> FETCH_HEAD
     * [new branch]      master     -> origin/master
fatal: refusing to merge unrelated histories
使用:git pull origin master –allow-unrelated-histories
- 出错 :
- 后面加上 –allow-unrelated-histories , 把两段不相干的 分支进行强行合并
5 . push 代码到远端
git push origin master7.3 总结
- 在Github网站建立远程仓库
- 使用
git clone <链接>可以将远程仓库克隆到本地仓库。
chapter(八)
8.1 对分支的理解
在第2章对版本回退说明时,讲到Git将每次提交都创建成一个时间线。而这条时间线就是一个分支,也就是现在唯一有的那个master。
master被成为主分支,还记得命令git reset HEAD <file>吗?
这里面有个HEAD,它就是指向master.
看下下面这张图,图是盗的:
 可以很清晰的看到,
master是指向最新提交,而HEAD是指向master,而那三个圈指的就是每次提交的内容,每提交一次master就会向前移动,这样就串成了一条时间线。
比如某天,你想回退某个版本,直接改变指向的位置,不久完了。
之前我们的分支只有一个master,可以我们可以创建别的分支啊!
创建分支的命令:git branch <分支名>
toto@pc:~/code/testGit$ git branch dev
toto@pc:~/code/testGit$  git branch --list
  dev
* master
根据上面代码块,先是创建了一个分支,然后使用命令git branch --list查看了下,有那些分支。
可以看到,有两个分支:dev和* master,dev是刚刚创建的分支,而master是主分支。
可为什么master前面要有一个*呢?
我想聪明的你,已经猜到了!
是的。那个*代表当前的HEAD指向的是master
我们在试着切换下分支,使用命令:git checkout <分支名>
toto@pc:~/code/testGit$ git checkout dev
Switched to branch 'dev'
toto@pc:~/code/testGit$ git branch --list
* dev
  master
看到没!切换分支后*跑到了dev前面!这是HEAD指向的就是dev
再无耻的盗个图:

有了刚才的演练,看这张图是不是已经很有感觉了!
当你创建新的分支dev时,聪明的Git也创建了一个指针dev,它与master指针都指向最新的提交。
而当切换分支到dev时,HEAD指向到了dev。
现在已经切换到了分支dev了,如果我们有提交了一次文件,那dev指针就向前走了一步,而master还是原地不动。
如下图:

toto@pc:~/code/testGit$ vim helloword.cpp
toto@pc:~/code/testGit$ cat helloword.cpp
#include<iostream>

int main()
{
	std::cout << "This is a program that test Git!" << std::endl;
	std::cout << "test git status" << std::endl;
	std::cout << "test git status2" << std::endl;// 新增的一行
	std::cout << "test new branch!" << std::endl;
	int a = 1;
	return 0;
}
toto@pc:~/code/testGit$ git status
On branch dev
Changes not staged for commit:
  (use "git add <file>..." to update what will be committed)
  (use "git checkout -- <file>..." to discard changes in working directory)

	modified:   helloword.cpp

no changes added to commit (use "git add" and/or "git commit -a")
上面代码,我修改helloword.cpp
toto@pc:~/code/testGit$ git add helloword.cpp
toto@pc:~/code/testGit$ git commit -m "test new branck"
[dev 828ea5e] test new branck
 1 file changed, 1 insertion(+)
toto@pc:~/code/testGit$ git status
On branch dev
nothing to commit, working tree clean
上面代码,我将helloword.cpp 提交上去。
请记住,现在提交到了dev中,而master指向上面那个版本。就如上图所示。
假设dev的工作已经完成了,那请问现在如何把两个分支进行合并呢?就是把dev合并给master
非常简单,我们只需要把master指针指向dev当前的提交,就行。
toto@pc:~/code/testGit$ git checkout master
Switched to branch 'master'
toto@pc:~/code/testGit$ git branch
  dev
* master
toto@pc:~/code/testGit$ cat helloword.cpp
#include<iostream>

int main()
{
	std::cout << "This is a program that test Git!" << std::endl;
	std::cout << "test git status" << std::endl;
	std::cout << "test git status2" << std::endl;// 新增的一行
	int a = 1;
	return 0;
}
上面的代码块,我现实切换了分支到master,然后查看了下代码helloword.cpp
可以发现helloword.cpp怎么没有改变啊!
我想你已经知道原因了!
那就是因为刚才所有的操作是dev分支上干的。再看下这张图:

master是指向上一版本的,当你切换分支后,master还是指向上一版本,那怎么可能改变呢?
现在把dev分支合并到master分支上.命令:git merge dev
toto@pc:~/code/testGit$ git merge dev
Updating 05e641d..828ea5e
Fast-forward
 helloword.cpp | 1 +
 1 file changed, 1 insertion(+)
toto@pc:~/code/testGit$ cat helloword.cpp
#include<iostream>

int main()
{
	std::cout << "This is a program that test Git!" << std::endl;
	std::cout << "test git status" << std::endl;
	std::cout << "test git status2" << std::endl;// 新增的一行
	std::cout << "test new branch!" << std::endl;
	int a = 1;
	return 0;
}
看到没,合并后helloword.cpp就是最新更改的版本了!
上面的提示信息Fast-forward指的是这次合并是快进模式,也就是把master指针直接指向dev。
ok!
假设我现在不想要分支dev了,我要把他删掉。
采用命令:git branch -d dev
toto@pc:~/code/testGit$ git branch -d dev
Deleted branch dev (was 828ea5e).
toto@pc:~/code/testGit$ git branch
* master
可以看到,已经删除掉了!
8.2 总结
命令:git branch <分支名>可以创建分支
命令git branch --list或git branch可以查看下有那些分支。
命令git checkout <分支名>或git switch <分支名>都可以切换分支
命令git merge <分支名>可以合并某分支到当前分支
命令git branch -d <分支名> 可以删除分支
chapter(九)
9.1 分支冲突如何解决
9.1.1 换一种新的方式创建切换分支
上一章主要讲的是如何创建分支和合并分支。可在Git实际的使用过程中,往往会遇到分支冲突的情况。 动手实践下: 假设现在创建一个分支conflict,还记得如何创建吗?
使用命令:git branch <分支名>可以创建分支。
然后再使用:命令git checkout <分支名>或git switch <分支名>切换分支。
现在我觉得有些麻烦,我重新找到了一种更加简单的方法:
那就是使用:
git checkout -b <分支名>或者git switch -c <分支名>直接进行创建并切换分支。
这就相当于把之前的两部直接变成一步了!是不是更加简单了点
注checkout和 switch都可以实现,我建议大家记一个就好。
推荐使用git switch -c <分支名>,因为switch有切换的意思,而checkout和之前的版本回退有重复!
ps:git switch是Git2.23版本才发布的新命令,如果出现下面的报错:git: 'switch' is not a git command. See 'git --help'
请进行如下操作:
git --version 确认下Git的版本
如果不是2.23以后的版本,请更新下Git,ubuntu环境下的升级见下面代码:
sudo apt update  # 更新源
sudo apt install software-properties-common # 安装 PPA 需要的依赖
sudo add-apt-repository ppa:git-core/ppa    # 向 PPA 中添加 git 的软件源
sudo apt-get update
sudo apt-get install git
9.1.2 创建冲突分支conflict
toto@pc:~/code/testGit$ git version
git version 2.31.1
toto@pc:~/code/testGit$ git switch -c conflict
Switched to a new branch 'conflict'
toto@pc:~/code/testGit$ git branch
* conflict
  master
上面代码提示已经创建并切换到新的分支conflict
下面我们给helloword.cpp增加一句话:
toto@pc:~/code/testGit$ vim helloword.cpp
toto@pc:~/code/testGit$ cat helloword.cpp
#include<iostream>

int main()
{
	std::cout << "This is a program that test Git!" << std::endl;
	std::cout << "test git status" << std::endl;
	std::cout << "test git status2" << std::endl;// 新增的一行
	std::cout << "test new branch!" << std::endl;
	std::cout << "test conflict branch" << std::endl;
	int a = 1;
	return 0;
}
toto@pc:~/code/testGit$ git add  helloword.cpp
toto@pc:~/code/testGit$ git commit -m "test conflict branch"
[conflict 33c858c] test conflict branch
 1 file changed, 1 insertion(+)
再切换到master分支中,进行如下操作:
toto@pc:~/code/testGit$ git switch master
Switched to branch 'master'
toto@pc:~/code/testGit$ git status
On branch master
nothing to commit, working tree clean
toto@pc:~/code/testGit$ vim helloword.cpp
toto@pc:~/code/testGit$ cat helloword.cpp
#include<iostream>

int main()
{
	std::cout << "This is a program that test Git!" << std::endl;
	std::cout << "test git status" << std::endl;
	std::cout << "test git status2" << std::endl;// 新增的一行
	std::cout << "test new branch!" << std::endl;
	std::cout << "test conflict branch in master!" << std::endl;
	int a = 1;
	return 0;
}
toto@pc:~/code/testGit$ git add  helloword.cpp
toto@pc:~/code/testGit$ git commit -m "test conflict branch in master"
[master d70cae4] test conflict branch in master
 1 file changed, 1 insertion(+)
此时我们分别在conflict分支和master分支,分别进行了修改,并进行了提交。
我们合并下,看看会出现什么?
toto@pc:~/code/testGit$ git merge conflict
Auto-merging helloword.cpp
CONFLICT (content): Merge conflict in helloword.cpp
Automatic merge failed; fix conflicts and then commit the result.
看到没,Git在提示我们产生了冲突!合并的冲突在helloword.cpp中,自动合并失败,修复冲突并重新提交结果。
git status下:
toto@pc:~/code/testGit$ git status
On branch master
You have unmerged paths.
  (fix conflicts and run "git commit")
  (use "git merge --abort" to abort the merge)

Unmerged paths:
  (use "git add <file>..." to mark resolution)
	both modified:   helloword.cpp

no changes added to commit (use "git add" and/or "git commit -a")
也提示了我们合并产生了冲突。
查看下helloword.cpp文件:
toto@pc:~/code/testGit$ cat helloword.cpp
#include<iostream>

int main()
{
	std::cout << "This is a program that test Git!" << std::endl;
	std::cout << "test git status" << std::endl;
	std::cout << "test git status2" << std::endl;// 新增的一行
	std::cout << "test new branch!" << std::endl;
<<<<<<< HEAD
	std::cout << "test conflict branch in master!" << std::endl;
=======
	std::cout << "test conflict branch" << std::endl;
>>>>>>> conflict
	int a = 1;
	return 0;
}
看到没,Git实在是有点智慧
它使用<<<<<<< HEAD、=======和>>>>>>> conflict保存了不同分支的内容,而这就是冲突的地方。
如上所示HEAD是当前分支,也就是master。
而conflict就是conflict分支!
如何解决冲突呢?
很简单,在当前状态下,重新修改helloword.cpp文件
toto@pc:~/code/testGit$ vim helloword.cpp
toto@pc:~/code/testGit$ cat helloword.cpp
#include<iostream>

int main()
{
	std::cout << "This is a program that test Git!" << std::endl;
	std::cout << "test git status" << std::endl;
	std::cout << "test git status2" << std::endl;// 新增的一行
	std::cout << "test new branch!" << std::endl;
	std::cout << "fix conflict!" << std::endl;
	int a = 1;
	return 0;
}
我注释的那句话和前面的两个都不同,std::cout << "fix conflict!" << std::endl;
toto@pc:~/code/testGit$ git add  helloword.cpp
toto@pc:~/code/testGit$ git commit -m "fixed conflict!"
[master 87b067d] fixed conflict!
toto@pc:~/code/testGit$ git status
On branch master
nothing to commit, working tree clean
此时的冲突就解决了!
我们可以用带参数的git log也可以看到分支的合并情况:
git log --graph --pretty=oneline --abbrev-commit
toto@pc:~/code/testGit$ git log --graph --pretty=oneline --abbrev-commit
*   87b067d (HEAD -> master) fixed conflict!
|\
| * 33c858c (conflict) test conflict branch
* | d70cae4 test conflict branch in master
|/
* 828ea5e test new branck
* 05e641d remove deleteFile.txt
* 190efbd test deleted file
* 7064df2 understand stage
* 74aada6 test git status2
* 2fe4439 add new line that test git status
* 01630fb test Git program
可以看到,git log以类似图的样子,解释了刚才冲突的情况。
把上面的铺开,看看下面这张图,是不是有点像!

ok!如何解决冲突,我们就演示完毕!
使用命令git branch -d <分支名> 可以删除分支
9.2 分支冲突总结
- 使用
git switch -c <分支名>可以创建并切换分支 - 使用如下命令,可以更新Git:
sudo apt update  # 更新源
sudo apt install software-properties-common # 安装 PPA 需要的依赖
sudo add-apt-repository ppa:git-core/ppa    # 向 PPA 中添加 git 的软件源
sudo apt-get update
sudo apt-get install git
git log --graph --pretty=oneline --abbrev-commit可以查看- 参数
-–graph含义:展示分支信息 - 参数
--pretty=oneline含义:用一行展示每次提交的commit id 和 提交注释信息 - 参数
--abbrev-commit含义:仅显示 SHA-1 的前几个字符,而非所有的 40 个字符。
- 参数
- 根据第3条,补充
git log常用参数含义:原文链接
# 展示前n条数据
git log -n
# 展示简要的每次提交行数的变化,及其他基本信息。
git log –stat
# 展示每次提交详细的代码变化
git log -p
# 用一行展示每次提交的commit id 和 提交注释信息
git log –pretty=oneline
# 展示分支信息
git log –graph

git log –pretty=format:""
    git log --pretty=format:"%h %s"
    # 个人log配置个性化输出命令
    git log --pretty=format:"%H %cd *%an*:%s(%ar)" --graph
    展示历史最后2次提交的commit id 和 提交注释信息
    git log -2 --pretty=format:"%h - %ad, %ar : %s"
    %H 提交对象(commit)的完整哈希字串
    %h 提交对象的简短哈希字串
    %T 树对象(tree)的完整哈希字串
    %t 树对象的简短哈希字串
    %P 父对象(parent)的完整哈希字串
    %p 父对象的简短哈希字串
    %an 作者(author)的名字
    %ae 作者的电子邮件地址
    %ad 作者修订日期(可以用 -date= 选项定制格式)
    %ar 作者修订日期,按多久以前的方式显示
    %cn 提交者(committer)的名字
    %ce 提交者的电子邮件地址
    %cd 提交日期
    %cr 提交日期,按多久以前的方式显示
    %s 提交说明

# 展示指定log信息,时间参数需要用UTC格式时间。
git log –since –author –grep
    -n 仅显示最近的 n 条提交
    –since, –after 仅显示指定时间之后的提交。
    –until, –before 仅显示指定时间之前的提交。
    –author 仅显示指定作者相关的提交。
    –committer 仅显示指定提交者相关的提交。
    git log hash.. 可以输出指定hash之后的提交

git log 参数参考
    git log 命令支持的选项
    -p 按补丁格式显示每个更新之间的差异。
    --stat 显示每次更新的文件修改统计信息。
    --shortstat 只显示 --stat 中最后的行数修改添加移除统计。
    --name-only 仅在提交信息后显示已修改的文件清单。
    --name-status 显示新增、修改、删除的文件清单。
    --abbrev-commit 仅显示 SHA-1 的前几个字符,而非所有的 40 个字符。
    --relative-date 使用较短的相对时间显示(比如,“2 weeks ago”)。
    --graph 显示 ASCII 图形表示的分支合并历史。
    --pretty 使用其他格式显示历史提交信息。可用的选项包括 oneline,short,full,fuller 和 format(后跟指定格式)。
chapter(十)
10.1 如何管理分支
在实际的开发过程中,可能会产生很多很多分支,尤其是在多人团队的合作中,大家都在各自的分支干活,等干的差不多了就进行合并。
为了避免出现错误:有一种合理的分支管理方法是非常重要的。
 根据上面的图片,提出的一种管理方法是:
每个人都在dev分支下干活,各自有各自的分支。
比如说李明在自己的分支干活,感觉差不多了,就把自己分支的内容合并到dev中。王二也是如此。 这样的好处是,dev分支的内容是总在变得,但是master是不怎么变得。这样遇到代码新版本生成时,只需要把dev分支合并到master中!
10.2 策略1:合并分支可Fast forward模式
还记得上一章的合并分支是怎么做的吗?
命令git merge <分支名>可以合并某分支到当前分支
合并完后,我们就把那个分支删除掉了。是吧!
命令git branch -d <分支名> 可以删除分支。
但是,这里有一个隐含的情况,那就是在删除分支后,我们曾经创建过这个分支的所有信息就都丢失了。
可是,有时候这些被删除的分支实在是有点重要!比如我们要版本回退到被删除的分支,那就完蛋了!
那有没有什么方法,可以保留呢?
方法肯定是有的。
但请允许我说下什么是Fast forward模式?
默认情况下,合并分支,Git都会使用Fast forward模式,就是因为这种模式的存在,所以才在删除分支后,丢失了信息。
所以,思路就很清晰了,我们不使用Fast forward模式进行分支合并不就可以了。
Git提供给我们的方法是:增加参数--no-ff,采用这种方式,Git在合并的同时还有生成一个新的git commit
废话不多说,直接开干:
toto@pc:~/code/testGit$ git switch -c dev
Switched to a new branch 'dev'
toto@pc:~/code/testGit$ vim helloword.cpp
toto@pc:~/code/testGit$ cat helloword.cpp
#include<iostream>

int main()
{
	std::cout << "This is a program that test Git!" << std::endl;
	std::cout << "test git status" << std::endl;
	std::cout << "test git status2" << std::endl;// 新增的一行
	std::cout << "test new branch!" << std::endl;
	std::cout << "fix conflict!" << std::endl;
	std::cout << "test --no-ff!" << std::endl;
	int a = 1;
	return 0;
}
toto@pc:~/code/testGit$ git add helloword.cpp
toto@pc:~/code/testGit$ git commit -m "test --no-ff!"
[dev 578163f] test --no-ff!
 1 file changed, 1 insertion(+)
上面是直接创建并切换一个新分支dev,然后修改helloword.cpp文件,并提交。
toto@pc:~/code/testGit$ git switch master
Switched to branch 'master'
toto@pc:~/code/testGit$ git merge --no-ff -m "merge with --no-ff!" dev
Merge made by the 'recursive' strategy.
 helloword.cpp | 1 +
 1 file changed, 1 insertion(+)
切换会master分支,并把dev分支合并到当前分支,注意增加了参数--no-ff,因为合并后进行提交,所以增加了-m "merge with --no-ff!"
toto@pc:~/code/testGit$ git log --graph --pretty=oneline --abbrev-commit
*   fe7b46e (HEAD -> master) merge with --no-ff!
|\
| * 578163f (dev) test --no-ff!
|/
*   87b067d fixed conflict!
|\
| * 33c858c test conflict branch
* | d70cae4 test conflict branch in master
|/
* 828ea5e test new branck
* 05e641d remove deleteFile.txt
* 190efbd test deleted file
* 7064df2 understand stage
* 74aada6 test git status2
* 2fe4439 add new line that test git status
* 01630fb test Git program
git log后的结果如上。
10.3 策略2:有时合并的分支可以强行删除
有时候在软件开发过程中,会遇到这样的情况:
当你在一个创建的分支里进行开发某个功能, 你感觉没啥问题了,就把当前分支合并到dev中,可是情况突然改变,比如这该功能老板说不需要了,那怎么办?
别担心,Git提供了我们该命令:即git branch -d强行删除
快点跟着实践下!
toto@pc:~/code/testGit$ git switch -c newfeature
Switched to a new branch 'newfeature'
toto@pc:~/code/testGit$ git branch
  dev
  master
* newfeature
toto@pc:~/code/testGit$ vim newFunction.txt
toto@pc:~/code/testGit$ cat newFunction.txt
Test forcibly delete
toto@pc:~/code/testGit$ git add newFunction
fatal: pathspec 'newFunction' did not match any files
toto@pc:~/code/testGit$ git add newFunction.txt
toto@pc:~/code/testGit$ git commit -m "Test forcibly delete!"
[newfeature f86af87] Test forcibly delete!
 1 file changed, 1 insertion(+), 1 deletion(-)
上面的示例先是创建了一个新分支git switch -c newfeature
然后增加了一个新文件vim newFunction.txt,进行add和commit
toto@pc:~/code/testGit$ git switch dev
Switched to branch 'dev'
toto@pc:~/code/testGit$ git branch
* dev
  master
  newfeature
toto@pc:~/code/testGit$ git branch -d newfeature
error: The branch 'newfeature' is not fully merged.
If you are sure you want to delete it, run 'git branch -D newfeature'.
toto@pc:~/code/testGit$ git branch -D newfeature
Deleted branch newfeature (was f86af87).
toto@pc:~/code/testGit$ git branch
* dev
  master
然后我们切换到dev分支,准备合并。
可老板说,这个功能需要取消掉,所以我们不能合并了!
先用之前的删除方法git branch -d newfeature,试试:
结果发现报错:这个分支还没有合并,如果确定要删除,请用’git branch -D newfeature’
用完之后,可以看到确实删除了!
done!
10.4 策略3:临时stash(储藏)分支
在实际开发中,会遇到这样的情况: 比如正在dev分支进行开发,还没有进行提交。但是你的boss说,前面的代码有bug,需要赶紧修复。 可问题是你在dev分支的工作刚进行了一半,你还不想提交,但你又不得不去处理bug。
放轻松,Git已经为我们想好了招:
那就是使用命令:git stash,把当前的工作现场储存下来,等以后需要在把这个现场恢复。这就类似一个快照
我们实际模拟下这个情况,直接干吧:
toto@pc:~/code/testGit$ git status
On branch dev
Changes not staged for commit:
  (use "git add <file>..." to update what will be committed)
  (use "git restore <file>..." to discard changes in working directory)
	modified:   README.txt

no changes added to commit (use "git add" and/or "git commit -a")
可以看到,假设我现在正在dev分支进行开发,此时的状态是我还没有进行提交,也不想提交。
我现在需要使用命令:git stash进行一个快照。把当前的现场保存下来。
toto@pc:~/code/testGit$ git stash
Saved working directory and index state WIP on dev: 0806247 Test forcibly delete
toto@pc:~/code/testGit$ git status
On branch dev
nothing to commit, working tree clean
可以看到此时的分支是干净的。
将当前现场保存下来,我就赶紧去处理bug。假设bug在master分支上,我就从master分支上创立新的临时分支,进行修改。
toto@pc:~/code/testGit$ git switch master
Switched to branch 'master'
toto@pc:~/code/testGit$ git switch -c bug001
Switched to a new branch 'bug001'
可以看到,我已经创建且切换到临时分支’bug001’上了。
现在开始进行bug修复,即在README.txt中增加一句话Repair BUG success !,然后进行提交。
toto@pc:~/code/testGit$ vim README.txt
toto@pc:~/code/testGit$ cat README.txt
This document is a description!
The name is README.txt!

Repair BUG success !
toto@pc:~/code/testGit$ git add README.txt
toto@pc:~/code/testGit$ git commit -m "Repair bug success!"
[bug001 6512255] Repair bug success!
 1 file changed, 2 insertions(+)
修改完,切换回master,合并,并删除分支bug001
toto@pc:~/code/testGit$ git switch master
Switched to branch 'master'
toto@pc:~/code/testGit$ git merge --no-ff -m "merged bug001" bug001
Merge made by the 'recursive' strategy.
 README.txt | 2 ++
 1 file changed, 2 insertions(+)
toto@pc:~/code/testGit$ git branch -d bug001
Deleted branch bug001 (was 6512255).
ok!bug修复完毕,可以王者回归dev分支了:
toto@pc:~/code/testGit$ git switch dev
Switched to branch 'dev'
toto@pc:~/code/testGit$ git status
On branch dev
nothing to commit, working tree clean
toto@pc:~/code/testGit$ git stash list
stash@{0}: WIP on dev: 0806247 Test forcibly delete
可以看到git status后是干净的,这是因为我们刚才建立了一个快照。
git stash list看下,可以发现,刚才那个快照的信息出来了。
此时恢复之前的工作状态有两种方法:
git stash apply恢复,但是恢复后,stash内容并不删除,你需要用git stash drop来删除;- 用
git stash pop,恢复的同时把stash内容也删了:
toto@pc:~/code/testGit$ git stash pop
On branch dev
Changes not staged for commit:
  (use "git add <file>..." to update what will be committed)
  (use "git restore <file>..." to discard changes in working directory)
	modified:   README.txt

no changes added to commit (use "git add" and/or "git commit -a")
Dropped refs/stash@{0} (517500724500357c5cd4c97579ec1683ab8beb6a)
toto@pc:~/code/testGit$ git stash list
toto@pc:~/code/testGit$
这两种恢复的方法区别是很明显的,可以根据实际情况进行选择。 这里不再演示方法1。
10.5 提交远程仓库Github
当在本地把代码修改的差不多了,可以选在将代码托管到Github中,方便其他人使用。
如果想查看远程仓库的信息,可以使用git remote
或者,用git remote -v显示更详细的信息。
origin  git@github.com:xxxx.git (fetch)
origin  git@github.com:xxxx.git (push)
可以看到上面的代码有抓取和推送的origin的地址。如果没有推送权限,就看不到push的地址。
推送分支到Github使用的命令:git push origin master,这是把master分支推送上去
如果想推送dev分支,那就是git push origin dev
10.6 总结
- 管理分支好的方法是:都在
dev分支进行写代码,每个人干完活,都提交到dev中,只有在代码进行重大改变的时候,在提交到master中 - 建议分支合并的时候,增加参数`–no-ff’
- 如果要丢掉一个没有合并的分支,可以使用’git branch -D newfeature’可以强行删除分支。如何合并了,直接版本回退。
- 使用命令:
git stash,可以把当前的工作现场储存下来,等以后需要在把这个现场恢复,恢复可用git stash apply和git stash pop。 - 查看远程库信息,使用
git remote -v git push origin branch-name可以从本地推送分支。
Git教程系列总结:
本教程都是自己的学习总结,这部分内容都是很基础的,也是在日常中普遍使用的,其实Git还有很多操作技巧,我是觉得作为新手,没必要知道的太详细。当自己使用的时候,直接Google下就好。 本人将其公开的目的:
- 是因为想帮助更多的人;
- 是因为互联网开源的精神;
- 是证明自己还存在于世。 系列文章如果要转载,请联系我。
本系列文章借鉴了:《廖雪峰Git教程》《精通Git》等
如果你对Git的基本原理想深入了解,建议自己手写一个简易版的Git


